From the importance of shooting bags to the nuances of the ballistic curve, Paul Austin explains everything you need to know to set up your rifle for true marksmanship.
As you embark on this journey of precision and patience in marksmanship, remember that mastery comes not from the quickness of the shot but from dedication to the craft. Every adjustment is a step closer to perfection.
Venturing into the realm of rifle shooting can feel like stepping into a new world, replete with its own language and rituals. Whether you’re a fledgling fieldsports enthusiast or a budding marksman eager to refine your skills, understanding the intricacies of setting up a new rifle and scope is paramount. This guide, tailored for beginners, will walk you through the process step-by-step, ensuring you’re well equipped to hit your mark every time.
The foundation
Before diving into the details of zeroing and adjustments, let’s talk about the essentials. The accuracy of your shot hinges not just on your skill but on how well you’ve set up your gear. Shooting bags, bipods and spirit levels are your unsung heroes in this regard. Shooting bags offer stability and reduce human error, enabling consistent positioning. Bipods, attached to the forend of your rifle, provide a steady rest, especially useful for portable long-range shooting. And spirit levels? They ensure your rifle and scope are perfectly aligned, preventing any cant that could skew your accuracy.
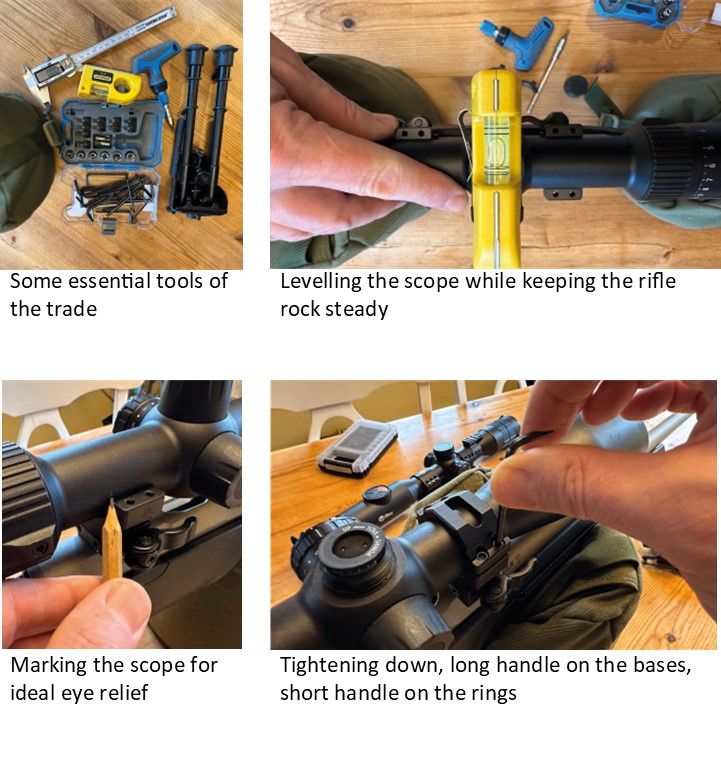
The first rule is to keep things simple. Some cheap shooting bags for front and rear are handy for benchrest shooting but also pull double duty as a platform for securing your rifle when attaching a scope. Don’t bother with lead sleds or fancy rests at this stage. A couple of bags and a large bag of the cheapest rice will suffice. Rice is ideal as it will conform to the stock really well and will hold it in position. Don’t be tempted to overfill the bags; they need to have a bit of give so that you can really push the rifle into position. The only other essential is a spirit level and the Allen keys that shipped with your scope.
If you’re considering scope swaps further down the line, for night vision for example, it’s well worth considering a rifle that ships with a Picatinny rail or has the option to add one, as this can make life much easier as
your shooting career progresses. I would also recommend an adjustable comb or perhaps a third-party comb raiser to create that perfect cheek weld.
When initially mounting on what’s often called a ‘pic rail’, push the rings towards the muzzle before tightening everything down, as recoil will want to force them in that direction. Your scope may ship with specific torque settings, but if you don’t have a torque driver follow this simple procedure.
Use the long arm of the Allen key to tighten your scope bases to the rifle. Fasten the screws up tight but you don’t need really to crank them aggressively into position.
When tightening the scope into the rings, flip the Allen key around and use the short end as the handle, this will stop you overtightening the rings and potentially crushing/damaging the scope tube. See the box on scope mounting for more details.
Unravelling ballistics
The path a bullet travels isn’t straight; it’s a curve. This ballistic curve is crucial to understanding the concept of a near and far zero. On leaving the barrel, a bullet rises to a peak before succumbing to gravity’s pull, creating an arc. The points where this arc intersects your line of sight are your near and far zeroes. The near zero is the initial crossing point and the far zero is where the bullet crosses your line of sight (and the middle of the crosshairs) once again, further away.
Every rifle and scope combination has a near and far zero. When shooting slower and smaller calibres the far zero is the one that has the most practical applications.
A .22 LR, for example, is typically zeroed around 50m. That’s the far zero, also known as the most recommended distance (MRD), producing a maximum point-blank range (MPBR) of 56m with a 1cm maximum trajectory height. That would put the near zero at 20m, so at both distances – 50m and 20m – the bullet should hit dead centre on the target, given a subsonic bullet travelling at typical speed and with an average scope height. These figures vary from one rifle to another but it’s a fairly typical example.
However, let’s say we’re shooting a much faster and flatter calibre such as a .22-250 firing a very light 35gr bullet. In this case the MRD would be 175m for the far zero, delivering a MPBR of 197m. In other words, over that 197m the bullet will only vary in height by 1cm. That’s quite a distance. The really good news is that the near zero is now at 83m, which you can use to zero your rifle easily, knowing that the far zero will still be spot on at 175m.
How do I know all these figures? That’s where a ballistic app becomes your best friend. Punch in your bullet speed, bullet weight and scope height, and the app will calculate all this for you. There are plenty of ballistic apps on the market, but they all do essentially the same job – the maths! A ballistic app is one of the most important bits of kit in your shooting arsenal, so get one downloaded.
So what is the meaning of ‘maximum point blank range’? It’s simply the range that the bullet remains within (in this case) a 1cm window. If you zero at the MRD (either near or far) you’re using the flattest part of the ballistic curve, which in the case of the .22- 250 would give you almost 200m of point- and-click shooting with no need for holdover and dialling. If you accept a maximum trajectory height from 1cm to 2.5cm (1"), the MPBR increases to a whooping 254m!
So you might be well be thinking, if that’s the case, why do shooting journalists always quote 100m or 100yd when they’re talking about rifles? It’s simple really; it’s just a point of reference. It doesn’t mean you have to use it. The 100m/yd figure just makes it easier to compare the performance of bullets or rifles relative to each other. When you’re comparing group sizes you need a set distance for the comparison to make sense of it. It’s that simple.
Why fuss over near and far zeros? It’s all about versatility and adaptation. Zeroing your rifle at the closer distance often provides a practical advantage when time or suitable ground is scarce. After all very few people have access to a 200m range close to home but they may still need to take the occasional longer shot in the field, and that’s where the duality of near and far zeroes comes in handy. It enables a quick setup, ensuring reasonable accuracy for most practical hunting ranges. This method acknowledges that while perfection is the goal, adaptability is often a necessity.
Read the full article in our May issue, on-sale 9 April 2024. Don't want to miss an issue? Subscribe to Sporting Gun HERE