A new era for Sporting Gun as part of the Fieldsports Press stable means a new set of readers and chance to refresh on some important lessons that I have already covered in the magazine and in Clay Shooting; lessons that remain of continuing importance.
I originally did this with a student of mine, Rhys Plum, at College Farm Shooting Ground in Oxfordshire, to remind ourselves of the fundamentals for good shooting.
PUTTING IT INTO PRACTICE
To kick things off, we began by shooting this single left to right rabbit target.
1. MAPPING THE TARGET
Before we start shooting, we must first map out the target, just as we covered in lesson two. On this particular target, Rhys found it best to note particular features on the ground, such as clusters of broken clay or mounds of grass, which could be used as reference points. After calling for the target (to view), Rhys set about marking his five reference points:
Here we can see that on this rabbit clay, the trap identification point and the visual pick-up point are the same, as the clay can be seen clearly off the arm of the machine. It is always important to note the target’s landing point or in the case of a rabbit clay, where the target stops. By knowing this point we know how quickly the target is decelerating, which will be useful later when deciding on our break point.
The break point will vary a lot from one shooter to the next, but essentially this is the point where you judge that the clay is most vulnerable. As we can see from the picture, Rhys has chosen this point to be roughly three-quarters along the line of the target.
Finally, having chosen the break point, Rhys created a bespoke hold point for the target, which allows him enough time to make a good connection with the clay and to make the shot at his break point.
To ensure consistency in Rhys’s hold and break point, we placed stakes in the ground, which showed Rhys where he would hold for and break the target, with a tolerance of about a foot. This is a great drill to do, particularly if you have had a break from shooting or want to improve your ability to repeat the same shot consistently, which is one of the biggest skills needed in shooting.
 LEFT TO RIGHT RABBIT TARGET
2 BOXING THE TARGET
Next, Rhys boxed the target to learn the line of the clay. In this case the rabbit enters the box at 9 o’clock and exists the box at 3 o’clock, hence this is not something that we have to pay particular attention to when making this shot.
3 METHOD SELECTION
Rhys says that, “Having studied this target, I decided to use a pull-away method, as this would force me into establishing a good connection with the clay between my hold point and break point. This method also allows me to match the speed and line of target and would mean that the rabbit would not require any perceived lead, as gun speed would ensure that I finished in the right place for this target, which is continuously decelerating (because of traction) and which is not so far away that it needs me to place the shot in front of the target.
“I also decided to start with my gun just out of the shoulder, which not only reduces tension in my mount by the time the rabbit reaches my hold point, but also helps me match the speed of the bird at the hold point, thus preventing the gun from flagging behind the target, which would force me into a swing-though shot – which is not what I have set up for.”
Rhys is perfectly justified in everything that he has said. However, it is important to remember that this target could be shot using any method and with an infinite number of break points; it is therefore down to the preference of the shooter to decide what set-up best fits the target(s) in hand.
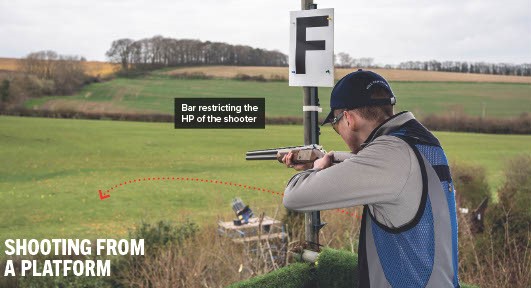
We later moved on to this platform, which presented some brilliant targets and emphasised the need for every shooter to create a bespoke plan for each shot.
Having mapped this target out and made our plan, we again noted the importance of foot position, posture and using the cage. Inevitably we shoot from a cage, box or hoop in which we are restricted when shooting, but shooters often make the mistake of not using the cage correctly.
When competing, I often see shooters standing in the middle of a cage/stand as if their feet are stuck in a concrete mould,which can make things harder for them.
To highlight the influence the cage can have on you, I had Rhys shoot from two sides (far left and far right) of the stand.
When forced into the centre, he had to make a much shorter, less controlled and less repeatable move on this right to left crossing target. Rhys was also restricted by the cage, which forced him to set his hold point before the post. But when allowed to stand off-centre, to the left of the cage, Rhys had a much greater advantage: “By using the stand in this way, I was no longer restricted by it. My field of view and shooting position seemed to be widened, all just by moving a few feet to the left. In making this change, I was able to make a much more controlled shot. I made a good connection with the target and broke it consistently.”
COMPETITION SCENARIO
Making use of the variety of stands and traps available at College Farm, we set about implementing what we had learned into a competition scenario. A regular drill that I do with students is to not let them move on from a stand until they shoot four or five pairs in a row.
This exercise simulates the repetition and consistency needed in a competition.
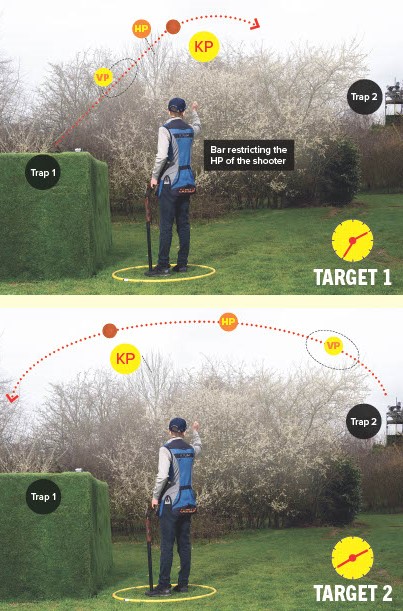
Rhys says, “This stand was nestled up in one of the corners of the ground. As we approached the hoop, it was obvious where one of the targets came from a trap on the floor on our left threw the first target – a shallow going-away bird. I could also make out a tower through the trees on our right, which housed the second target, a fast and fairly awkward right-to-left midi. The midi came fast off the arm and climbed for the first three- quarters of its flight, before beginning to turn and drop away behind the trees.
“I mapped out the first target, paying special attention to where it peaked and where I could first see it clearly. For this kind of clay, I wanted to minimise gun movement and gun speed, as this would likely lead me to shooting in front of this short and shallow target. I marked two particular twigs on the tree in front of me, one where I would hold the gun, and the other where I saw the bird as most vulnerable – just before it reached the apex.”
This target still needs equal attention as with any other. It is these shallow angled targets where ‘Shooting the Clock’ is extremely important. On this going-away bird, at Rhys’ kill point, the target enters the box at 7 o’clock and exits the box at 2 o’clock, and so we must be sure to shoot the top left of this target in order to stay on line. That said, this is all relative to the kill point; had we have chosen to shoot this same target a second later, we would need to shoot around 4 o’clock on the clay as it begins to drop.
“I chose to shoot this target using the swing- through technique for two reasons: 1) By swinging- through from behind the clay, I am sure to be on the line of the target (one of three factors needed to break any bird). 2) I know that this target will not require any perceived lead and so all I need to do is ensure a slow gun and pull the trigger as I catch up with the bird. The only other factor I considered is the speed at which the gun moves, relative to the target.
I managed this by moving my leading hand slightly up the fore-end, which naturally slows down the speed of the gun, allowing me to make a controlled and precise move on this first target.”
At first, this might seem like an awful lot to consider for what could be labelled as an ‘easy’ target. While some may argue this type of target requires less technical finesse, each shot is only worth one on the card, and so each shot must be given equal attention to improve your score overall.
As Rhys says, the second target was not easy but with careful thought and planning, it can be added to the scorecard. To do this, he ran through the same steps we use on every target we shoot.
1.MAPPING THE TARGET
“I could just make out the trap through the trees, which did not tell me much about the target, other than it was elevated. With this bird being a midi, I had to remind myself of its deceptive size when it came to shooting. It’s easy to fall into the habit of thinking the clay is further away than it really is, especially on this target where I could not see where the clay lands. I could not see the bird until it broke the trees, but then I followed it along its flightline for quite a way, before it dropped and disappeared, landing some distance away. I set my break point to be just before a gap in the trees, before the bird begins to drop.”
It is vital to recognise that at this point, the bird is slowing down. The bird’s flight can even be split into three parts to see where it accelerates, where it plateaus at the apex and then slows down, before beginning to drop.
“Knowing this, I decided to bring my hold point back along the line of the target and to drop the gun out of the shoulder, to a point that allows me to establish a good connection with the target while not creating too large of a gap between hold point and kill point, which could potentially produce inconsistencies.”
2 BOXING THE TARGET
"At my chosen break pont the target enters the box at 2 o’clock and exits at 8 o’clock. The bird is also slowing down and begins to drop just a few feet afterwards. I needed to be sure that when applying lead to this target my gun followed the line out to 8 o’clock, to stop shooting over the top of the bird.”
3 METHOD SELECTION
"For this target, I needed to match and adapt to the speed of the bird throughout the shot and be able to pull off from the line of the target to 8 o’clock at the kill point. I would therefore shoot this target using a pull-away method.”
TOP TIP
Correct posture is important when addressing this target. Posture and movement should be played around with in training to see what feels most comfortable for you.
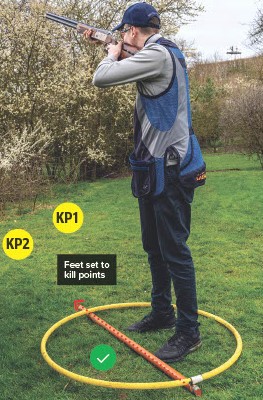
Foot Position
I did notice that Rhys had not given enough thought to his foot position. As seen below, Rhys adapted a rather square and open stance, which did not put him in the best position to move efficiently to and through the targets. He was unable to finish off the shot as he was out of balance.
The red arrow indicates the direction Rhys’ feet are set to kill targets; those of you who play golf will understand this concept. This was completely out of place as his feet needed to be set further round to the left. By making this change, Rhys was able to make a more biomechanically efficient shot, which made it easier for him to repeat the same move again and again.
Despite the fact that the foot position for the first target is more central than that of the second, Rhys made the decision not to move between shots and instead set his feet for both targets in the same position.
Usually this is not acceptable, because the first target requires such little horizontal movement, but in this case it was a good decision, allowing the shooter to focus on nothing else but the bird. I hope that you found this recap useful.

MATT HANCE
Matt Hance is a top Sporting shot and coach and he has been shooting Sporting and FITASC for Britain for more than three decades and won multiple British and English titles. Here, Matt teamed up with one of his students, Rhys Plum, to share his skills and experience, starting with the basics and going on to teach advanced techniques that are guaranteed to improve your shooting. To catch up with what has been covered, or if you have any questions for Matt about the methods, please email paul.austin@fieldsportspress.com
A topic for future consideration is to take a look at everything that can be done off the range to optimise your success on it